Taiwan Luoke colony counter Galaxy330, Galaxy331 operation manual
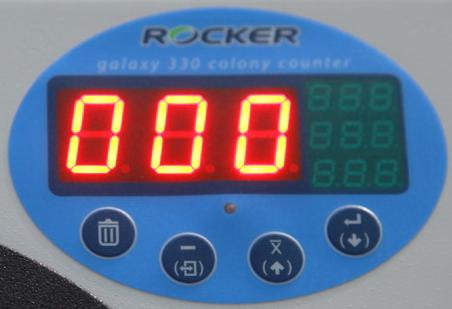
Taiwan Loco Colony Counter Operation Manual Galaxy 330 Colony Counter This instrument is designed for use in the laboratory. Before using this instrument, the user must read this operating manual in detail. This instrument must not be modified in any way. All non-authorized modifications will void the warranty and may pose a safety hazard. Loco Instruments is not responsible for any damage to the machine and personal safety caused by any modifications. Before unpacking this product, please make sure that the box is not damaged. If you have any questions, please keep the serial number and packing box and contact your local dealer for assistance. model Galaxy 330 Galaxy 331 software (optional) package content Galaxy 330 host magnifier Magnifying glass stand transformer Counting pen (black) screwdriver Operating instructions X1 X1 X1 X1 X1 X1 X1 Install the software flash drive USB cable installation instruction X1 X1 X1 Line content 1 Galaxy 330 host 2 magnifier 3 Magnifying glass stand 4 USB cable (optional) 5 transformer 6 screwdriver 7 Counting pen 8 Install the software flash drive (optional) Host introduction Line content Line content 1 Power outlet 8 Fixed disc 2 switch 9 Petri dish position adjustment cleat 3 Operation panel 10 background 4 Magnifying glass stand 11 Induction sensitivity adjustment button 5 Magnifying glass adjustment screw 12 Prompt volume adjustment button 6 magnifier 13 Background light level adjustment button 7 Petri dish placement area 14 USB connection socket Line content 1 Counting value display (LED-A) 2 Store numerical display (LED-B) 3 Store value display (LED-C) 4 Store numerical display (LED-D) 5 Input key / down key 6 Average key / up key 7 Subtraction key/away key 8 Clear key 9 USB connection indicator (green - connection / red - off) Installation Notes Line Description 1 Magnifying glass holder fixing screw hole 2 Magnifying glass stand 3 Magnifying glass adjustment screw 4 magnifier Host operation instructions Button and light (1) Normal mode: Input key Store the counted data in the host Average key Average the stored data <Displayed on the count value display (LED-A) > Subtraction key Decrease the count value displayed by the count value display (LED-A) by 1 (beep prompt) Clear key Clear key: Clear the data of the count or the last stored data. <Send a long beep> (2) View mode: Leave button When the value of (LED-A) is "000", press and hold for about 1 second to enter "View Mode". Press again to leave the viewing mode Down button View next data Up button View previous information Clear key Delete the data currently flashing in the stored value display (LED-B/C/D) <Send a long beep> (3) Connection indicator: Green light.. The light table connection is normal, the data transmission is successful; the flashing table data transmission Red light.. Lights the table connection error, data transmission failed. All off.. indicates that no computer connection is detected. Host operation instructions (normal mode) Place the culture dish (1) in the culture dish placement area, and move the culture dish position adjustment buckle (2) to adjust the culture dish to the center position. Note: 60 mm diameter petri dish can be fixed to a disc placed at the center. Confirm that the value of LED-A is "000" before starting counting, and LED-B, LED-C and LED-D do not display numbers. If there is a value, please press "Clear" to clear the error data. Use the counting pen to point to the lid above the colony of the culture dish. At this time, the power of the host to sense the point pressure will increase the value of LED-A by one, and can continue to increase until 999. If there is a count error or repeat count, press the "decrement key" to decrease the value of LED-A by one. (a beep) When the counting is completed, press the "Enter" button to store the count data and display it in LED-B. Replace the other dish and repeat the above steps. When the "Input Key" is pressed, the data will be stored in sequence and displayed on LED-B, LED-C, LED-D. When the count is completed, you can press and hold the "Leave button" to enter "View Mode" to confirm that the count data is correct. Press the "Leave button" again to return to normal mode. <View mode operation steps, please refer to the description on the next page> After confirming that there is no error in the count data, please press the "average key", the recorded data will be averaged, and the result will be displayed on LED-A; The average value displays up to three digits, and the fourth digit or the second digit of the decimal point is unconditionally discarded and not displayed. Note: The result is " XX " , "XX.X" or "XXX.". note: (1) If there are more than three strokes, press the "Input Key" to store the count data in LED-D, and the data of the last two will be displayed one by one on LED-C and LED-B. There is storage but not displayed. (2) The host records up to 100 data. After the host is over, the host will not be able to use it. It is necessary to delete the data or calculate the average value. If the host is connected to the computer, when the average button is pressed, the recorded data and the average value will be transmitted to the operating software on the computer. Refer to the "Computer Software Installation and Operating Instructions" electronic file on the flash drive to use the software to further organize the data and print the report. After the experiment, please follow the maintenance method for cleaning and maintenance. View mode When the value of LED-A is displayed as "000", press and hold the "Leave button" for about 1 second, and the host enters the view mode. Note: LED-A will display the total number of stored data when the button has not been released. After releasing the button, the stored data will be displayed in LED-B/C/D. The currently selected data will flash and its corresponding number will be displayed on LED-A. Press the "Down Arrow" to switch down to select the deleted data. When you press the "down arrow" on the last stroke, a beep will sound Press "Up" to switch up and select the deleted data. When the first pen is pressed and the "up arrow" is pressed, a beep will sound. Press the "Clear button" to delete the flashing data and make a long beep. (Please confirm again before deleting) Press "Leave button" to return to normal mode Product Maintenance Troubleshooting Fault phenomenon Cause and treatment Internal part failure or internal line release à returned to the manufacturer for processing. Turn the volume adjustment knob with the screwdriver to adjust the volume to the maximum. The motherboard failure à is sent back to the manufacturer for processing. Turn the sensitivity sensitivity adjustment knob with a screwdriver to adjust the sensitivity to the maximum. Ordering information 175330-02 Galaxy 330 colony counter (European plug transformer) 175331-01 Galaxy 331 Colony Counter + Software (US standard plug transformer) 175331-02 Galaxy 331 Colony Counter + Software (European Plug Transformer) 175330-12 Galaxy 330 Dedicated Software Xiamen Luoken Instrument Co., Ltd. Plant Support,Plant Spiral Wire,High Quality Twine Wire,Tomato Spiral Stake JIANGSU SKYPLAN GREENHOUSE TECHNOLOGY CO.,LTD , https://www.thgreenhouse.com
Assembly and accessories drawing 

Panel introduction 


(a beep) 


175330-01 Galaxy 330 Colony Counter (US standard plug transformer)