Single punching machine description and maintenance knowledge
First, the use and characteristics of small tablet press 2. Before each shift, check whether the screws are loose. During the work, always pay attention to the inspection. If it is loose, tighten it immediately to avoid malfunction. Its main parts are:
TDP-1.5T single punching machine can press the granular material into tablets, which can be widely used in pharmaceutical factories, chemical plants, hospitals, scientific research units, laboratory trial production and small batch production.
The machine has excellent performance, strong adaptability, convenient use, easy maintenance, small size, light weight, and can also be shaken when there is no electricity. This machine only installs a die, the filling depth of the material and the thickness of the tablet can be adjusted. It can adapt to the requirements of the pharmaceutical industry to suppress various Chinese and Western medicine tablets and the requirements of other industries to suppress various similar products. User's welcome.
Second, small tablet press technical specifications 
Third, the installation and wiring of small tablet press
1. The tablet press is mounted on a solid wooden workbench (also mounted on a concrete platform) with three M12 anchor screws. The working surface to the ground is about 600 mm (hand-operated, easy to operate).
For the convenience of disassembly and repair, there should be a hole with a diameter of about 35 mm on the wooden table corresponding to the position of the lower punch rod.
2. Connect the motor to the ground wire before turning on the motor source to ensure safety.
Then remove the V-belt, turn on the motor power, and start the motor to see if the motor rotates in the correct direction (the direction of rotation of the motor shaft should be the same as the direction of the arrow on the large pulley). If the direction of rotation is wrong, connect the cable separately, then put the triangle. The belt is installed.
Fourth, the use of small tablet press die
1. Die installation:
(1) Installation undershoot
Loosen the lower punching set screw, turn the large pulley to raise the lower punching rod to the highest position, and insert the undershoot into the hole of the lower punching rod (note that the notched slope of the lower punch is aligned with the lower punching fastening screw and is inserted In the end, finally tighten the undercut fixing screw.
(2) Installation on the punch
Loosen the upper fastening nut and insert the upper punch into the hole of the upper punching rod. Insert it into the bottom and tighten the upper tightening nut.
(3) Installation of the medium mold
Loosen the middle mold fixing screw, put the middle mold flat into the hole of the middle mold platen, and make the lower punch into the hole of the middle mold, press the bottom and then tighten the middle mold fixing screw. When placing the mold, pay attention to flatten the middle mold to avoid jamming when the skew is placed and damage the hole wall.
(4) Turn the large pulley by hand to make the upper punch slowly descend into the middle die hole to observe whether there is collision or friction. If there is collision or friction, loosen the middle die plate fixing screw (two), adjust The position of the die plate is fixed so that the upper punch enters the middle die hole, and then the middle die plate fixing screw is tightened, so that the upper punch enters the middle die without collision or friction for the installation.
2. Adjustment of film
Rotate the large pulley to raise the lower stroke to the highest position. Observe whether the lower punch surface is aligned with the plane of the middle mold (or both high and low will affect the output). If not, loosen the butterfly screw and loosen the gear pressure plate. Adjust the gear so that the lower punch surface is aligned with the plane of the middle mold, then press the platen up and tighten the thumb screw.
At this point, turn the large pulley by hand, and the empty car runs for more than ten revolutions. If the machine is running normally, the pressure can be added and the next step can be adjusted.
3. Adjustment of filling depth (ie adjustment of tablet weight)
Loosen the thumb screw and loosen the gear platen. Turning the lower adjustment gear to the left to raise the lower punching rod, the filling depth is reduced (the weight of the tablet is reduced), and the filling depth is increased (the weight of the tablet is increased). After adjusting, press the gear platen and tighten the thumb screw.
4. Pressure adjustment (ie adjustment of tablet hardness)
Loosen the knurled screw and adjust the eccentric copper sleeve downwards, the pressure will increase, and the hardness of the pressed tablet will increase. Conversely, if the upward adjustment, the pressure will decrease, the hardness of the tablet will decrease, and the knurled screw will be tightened after adjustment, which will be eccentric. The wheel copper sleeve can be locked.
At this point, the adjustment of the die is basically completed, and then the motor is tested for more than ten pieces. If the quality of the piece weight, hardness and surface finish are qualified, the material can be put into production. In the production process, the quality of the tablets must be checked at any time and adjusted in time.
5. Disassembly of the small tablet press die
(1) Disassembly and overshoot
Loosen the upper tightening nut to pull out the upper punch. If the fit is tight, use the pliers to clamp the upper punch to pull it out, but be careful not to damage the punch.
(2) Disassembly of the middle mold
Loosen the middle mold fixing screw. Unscrew the lower set screw, loosen the thumb screw, and loosen the gear platen. Rotate the adjusting gear to raise the lower punching rod by about ten millimeters. Gently turn the large pulley to make the lower punching rod push out the middle part and remove the middle mold by hand. If the middle mold fits tightly in the hole, it cannot be Firmly turn the hard top of the handwheel to avoid damage to the machine. At this time, the middle die plate must be removed and the middle mold removed.
(3) Disassembly undershoot
The lower punching screw is first unscrewed, and then the handwheel is turned to raise the lower punching rod to the highest position, and the upper punch can be pulled out by hand. If it is tightly fitted, it can be pinched out with a pliers (be careful not to damage the punch edge).
(4) After the die is disassembled, the adjusting gear must be rotated to make the lower punching rod retreat about 10 mm. When the handwheel is turned to raise the lower punching rod to the highest position, the top end is not higher than the bottom surface of the middle die plate. (Do not ignore this step, so as to avoid the accident of the impact of the undershooting core and the middle die.) Finally, the undercut fixing screw is still screwed on.
5. Disassembly and installation of main parts
1. Mold plate
Disassembly: Pull out the powder retaining plate, remove the hopper, unscrew the feeder set screw, unscrew the feeder fixing stud and spring, remove the feeder, unscrew the middle die plate fixing screw and spring washer, then remove the middle Mold plate.
Installation: Refer to the reverse order above. Pay attention to alignment when screwing the feeder tightening screw. So as not to damage the wire hole of the feeder.
2. Upper core rod:
Disassembly: Loosen the small shaft tightening screw of the upper punching rod, take out the small shaft, and then loosen the upper punching rod set screw. First remove the spindle (refer to the 5 spindle), and pull it out. When installing, you must first install the upper punch rod before installing the spindle.
3. Under the core:
Disassembly: Unscrew the lower fixing screw, the butterfly screw and the gear pressing plate rotate the adjusting gear to lower the lower punching rod and take it out from the bottom hole of the fuselage. Installation: Refer to the reverse order above.
4. Large pulley, pinion and bridge axle
Disassembly: Lower the V-belt, unscrew the left and right ends of the bridge shaft and the pressure plate, tap the large pulley with a wooden hammer, remove it, pull out the bridge shaft, and then knock the pinion with a wooden hammer. .
Installation: Refer to the reverse order above.
5. Spindle:
Disassembly: The disassembly of the spindle should be carried out by two people. First remove the protective cover, then remove the large gear, loosen the lifting cam and the eccentric wheel, and tighten the screws. Remove the material cam, then hammer the shaft end with a wooden hammer and a copper rod (be careful not to damage the screw hole at the shaft end), and hold the other end of the shaft and hold the eccentric wheel housing and the lifting cam to slowly remove the spindle. (Note: Do not lose the lifting roller and the pulling roller.)
Installation: Refer to the reverse order above.
6. Lubrication and maintenance of small tablet press machines
1. Lubrication of the friction surfaces of all moving parts is an important part of ensuring the normal operation of the machine and prolonging the service life. In particular, if the main moving parts are dry and run in the absence of oil, they will be quickly damaged and cannot be used. Therefore, the tablet press is used before use. It is necessary to add lubricating oil to all the oil cups, oil holes and friction surfaces, and operate the air to make the friction surfaces full of oil film before they can be put into use. In the future, each shift will be refueled on time, but it should not be too much for each refueling, so as to avoid spillage affecting cleaning and staining the tablets. The fueling parts and the number of fueling are shown in the following table:
Refueling part and refueling times 
(1) Upper punch fastening nut, middle die fixing screw, undershoot fixing screw;
(2) upper punching rod small shaft fixing screw;
(3) Lifting fork lock nut (2) butterfly screws;
(4) medium mold platen fixing screws;
(5) hopper fixing screws;
(6) Pull rod connecting screw.
3. Before each shift and after each shift, you must manually test a few pieces, and then turn on the electric tablet after no problem.
4. In the process of tableting, the quality of the die should be checked frequently. If there is a missing edge, crack, or severe damage, it should be replaced in time to avoid damage to the machine and affect the quality of the tablet.
5. After using each day, remove the remaining powder and wipe off all parts of the machine. If the deactivation time is long, the die must be removed, the friction surface and working surface of the machine should be wiped clean, coated with anti-rust oil, and covered with dust-proof clothing; the die should be wiped clean and immersed in oil to protect the desktop publishing system.
6. Check the machine regularly twice a month.
Seven, small tablet press use precautions
1. Read the instructions carefully before using the machine for the first time before using it.
2. The machine can only be operated in a certain direction (see the arrow on the handwheel or guard) and cannot be reversed to avoid damage to the machine. Pay special attention to the adjustment of the tablet, do not neglect.
3. Belt tension adjustment: Adjusted by two adjusting nuts on the electromechanical base plate. Pay attention to the lock after adjustment.
4. For electric compression, the upper punch rod should be in the raised position and then restarted before starting. If the upper punch is started in the lowered position, the medium-molded piece is entered just after the start of the start. At this time, since the rotation speed of the machine has not been increased, the inertia is likely to occur. (That is, after the upper punch enters the middle mold, it is "top dead" due to the resistance of the tablet, so that the machine stops running. When the top car is loaded, the machine is often damaged or the motor is burned due to the heavy load).
5. After the car is handled
(1) When the car is in the process of electric pressing, the power should be turned off immediately to avoid burning the motor.
(2) When the top car is light, you can use the hand to turn the handwheel to make the upper punch pass the "dead point" (but not reversed, so that the feeder does not repeat the feeding, resulting in a more serious top car).
(3) When the vehicle is severely jacked, the small shaft of the upper punch must be removed to raise it to reduce the pressure. Then turn the handwheel to push the tablet out and then adjust the hardness of the tablet.
6. During the tableting process, the quality of the tablets (sheet weight, hardness, surface finish, etc.) must be checked and adjusted in time.
7. The batching process before tableting has a great influence on the tableting. The formulation of granules (the condition of the powder, the tightness of the granules, the proportion of the powder, the water content, etc.) of the medicinal materials and the materials such as the slips, fillers and binders directly affect the quality of the tablets. And often due to improper granulation of ingredients, it is impossible to form a piece or even damage the machine. Therefore, this machine cannot be used for semi-solid or moist or non-granular fine powder tableting. If it is found that the pressure has been adjusted to a considerable extent during use, it is still not pressed into pieces or pressed into pieces but appears too loose, layering, chipping, pitting, falling powder, etc., and the reason should be found out from the ingredients and other aspects. Do not blindly adjust to increase the pressure, and even damage the machine. In addition, although the hardness of the tablets extruded by some medicines is not large, it has certain toughness, and its anti-shock and shock resistance is not bad (usually it can be broken from the height of 1-1.2 meters on the ground), so it should be satisfied. The requirement for operation and storage is not to focus on the hardness alone, so as to avoid excessive pressure on the tablet and damage the machine.
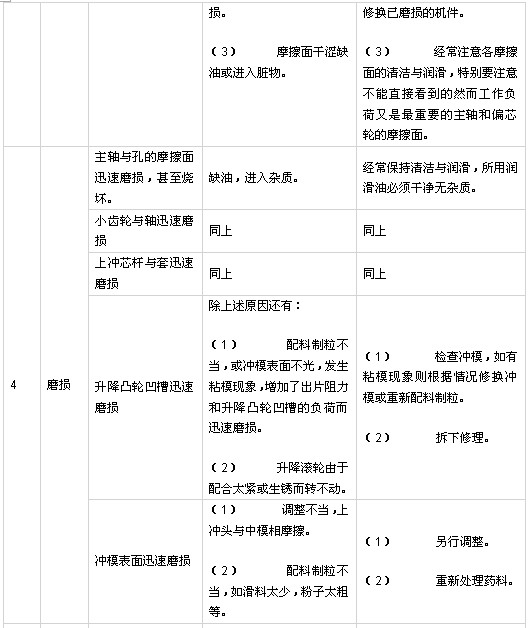
Eight, common failure of small tablet press